Thursday, July 25, 2019

Change case tool in Ms Word

Change Case

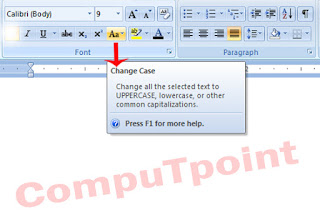
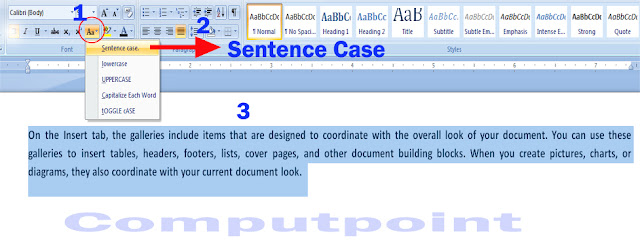
Change case is one of the tool in ms word. which is used to change all the selected text to Uppercase, Lowercase, Toggle-Case, or other common capitalization. which is shown in the below image.
Change-Case-in-Ms-Word.jpeg
Change Case can be classified into five types they are:
  1. Sentence Case
  2. Lower Case
  3. Upper Case
  4. Toggle Case
  5. Capitalization
Sentence-Case : Sentence Case is one of the option on change case tool in ms word. which is used to change the sentence case i.e first letter of the paragraph is capital letter. which is shown in the below image.
Sentence-Case-in-Ms-Word.jpeg
  1. First, we take an simple paragraph sentence and select it.
  2. Click on the Change case tool on the right side option bar.
  3. Select the Sentence Case option.
  4. Automatically it changes into the sentence case which is shown as above image.
Lower-Case : Lower Case is one of the option on Change Case tool in ms word. Which is used to change the sentence into Lower Case i.e first letter of the paragraph is small letter. which is shown in the below image.
Lower-Case-in-Ms-Word.jpeg
  1. First we take an sample paragraph sentence and select it.
  2. Click on the Change Case tool on the right side option bar.
  3. Select the Lower Case Option.
  4. Automatically it changes into Lower Case which is shown as above image. 
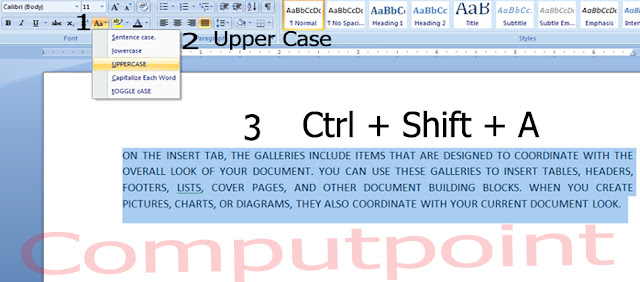
Upper Case: Upper-case is one of the option on change case tool in ms word. Which is used to change all the letter into Capital letters. Which is shown as in the below image.
Upper-Case-in-Ms-Word.jpeg
  1. First, We take an sample paragraph sentence and select it.
  2. Click on the Change Case tool on the right side option bar.
  3. Select the Upper case option .
  4. Automatically all letter will be changed into capital Letters which is shown as like above image.
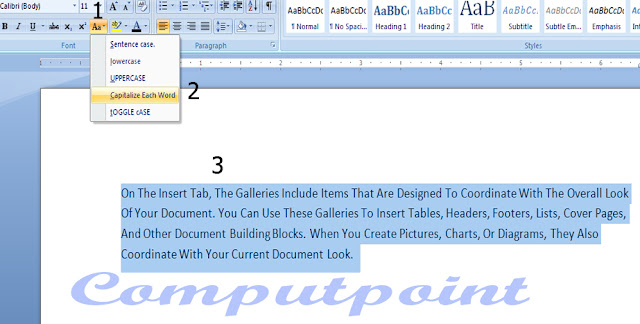
Capitalized Each Word : Capitalized each word is one  of the option  on change case tool in ms word. Which is used to change  all the first letter of word as capital which is shown as below image.
Capitalized-Each-Word-in-Ms-Word.jpeg
  1. First,We take an sample paragraph sentence and select it.
  2. Click on the Change Case tool on the right side option bar.
  3. Select the Capitalize Each Word option.
  4. Automatically it changes the Capitalize the each word which is shown as a above image.
Toggle Case : Toggle Case is one of the option on change case tool. Which is used to change the first letter of the word is  small which is shown as below image.
Toggle-Case-in-Ms-Word.jpeg

Tuesday, July 23, 2019

Tools and Options of Font Alignments in Ms Word

Font Alignments in Ms Word


A font alignment is one of the tools and options in Ms-Office. The word font alignment indicates that how to set the text alignment in a document. It May Includes the Letters, Symbols, Characters, Paragraph and Numbers etc. 

Ex:~    ,` ! @,  A B C D E F , 1 2 3 4 5 6.   Computpoint etc.

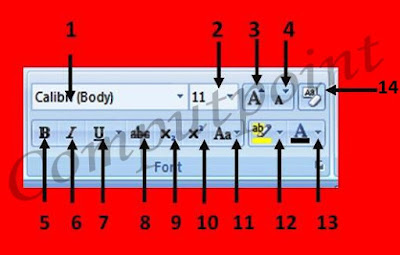
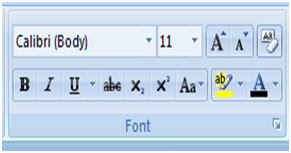
The below examples are the text alignment tools which is to be set the font settings in a document which is shown below image. 

For example  Bold , Italic , Underline , Font setting,  Font Size, Increment, Decrement, Clear Format, Strike Off, Sub script, Super Script, Sentence Case..
Tools-and-Options-of-Font-Alignment-in-Ms-Word.jpeg
The Font alignments can be classified into different types They are:
  1. Font Face
  2. Font Size
  3. Increment
  4. Decrement
  5. B (Bold)
  6. I (Italic)
  7. U (Under Line)
  8. Strike Off
  9. Sub Script
  10. Super Script
  11. Sentence Case
  12. Text Highlight Colors
  13. Font Colors
Font FaceFont face is one of the tool in font option. Which is used to change the font face with different Formats which is shown on the below image.
  1. Click on the font face tool (OR) CTRL + Shift + F short cut key.
  2. Tap the option button on right side bar and display the different font style.
  3. Select the particular option of the font style.
  4. Automatically  it changes the font style which is shown as above image.
➧ Font Size: Font size is one of the tool in font setting option. Which is used to change the font size option. Its start from 11 pt to 70 pt range which is shown as below image.
Font-Size-option-in-Ms-Word.jpeg
  1. Click on the font size Tool Option. By Default it contains 11 pt  and put the values up to 70 pt range.
  2. Tap the option button on the right side bar.
  3. Select the particular font size from 11 to 70 range. 
  4. Automatically the font size is changed which is shown like as above image.
➧ Increment & Decrement: Font Increment & Decrement are two tools option. Which is used to increase and decrease the font size which is shown in the below image.
Font-Increment-and-Decrement-In-Ms-Word.jpeg
  1. Write a sample text on a blank page like Computpoint.
  2. Click on the Increment tool (Ctrl + Shift + > ) / Decrement tool (Ctrl + Shift + <) short cut keys.
  3. Then automatically font size is increasing / decreasing which is shown above image.
Bold & Italic & UnderlineBold, Italic, Underline are the tools option in ms word. Which is used to bold, italic, underline the text which is shown the below image.
Bold-Italic-Underline-the-text-in-ms-word.jpeg
  1. First, write  a sample text on a page and select it through the mouse.
  2. Click on the B (Ctrl + B) , I (Ctrl + I) , U (Ctrl + U) Tools as like a image.
  3. Automatically the font text is changed.
Strike throughStrike Through is one of the tool option in ms word . Which is used to draw a line through the middle of the text which is shown in the below image.
Strike-Through-Of-Text-in-Ms-Word.jpeg
  1. First, we write a sample text  page like Computpoint and select it through the mouse.
  2. Click on the Strike Through tool option as like shown on the above image.
  3. Automatically, it draws a line through a middle on the text.
Super & Sub-Script: Super-Script is one of the tool option in ms word. Which is used used to create a small letters on above  of text. Sub-Script is one of the tool used to create a small letters below text which is shown below image.
Super-Script-and-Sub-Script-in-Ms-Word.jpeg

Friday, July 19, 2019

Tools And Option Of Home in Ms Word

Home Options In MS Word

In Ms Office Package, They are different types of sub-packages called Word, Excel, Power Point, Ms Access. In this Post we are learning about Ms Word  package.

In this Ms Word package, we have different types of Tools and Options for preparing the document formats in Home Option  Which is shown below image.
                    Tools-on-Home-Options-in-Ms-Word..jpeg

1. Office Button
2. Quick Access Tool Bar
3. Menu Bar
4. Clipboard
5. Font Settings
6. Paragraph alignments
7. Font Styles
8. Indent
9. Rulers Bar
10. Status Bar.

1. Office Button

In Ms Word, Home is one of the option settings which is used to prepare the document formats.  In that Home option first one is Office Button which is shown in the above image. In Office Button can classified in to different type of options they are:
Office-Button-in-Ms-Word.jpeg
1. New
2. Open
3. Save
4. Save as
5. Print
6. Prepare
7. Send
8. Publish
9. Close

2. Quick Access Tool Bar

In home option, Quick Access Tool Bar is one of the tool which will show about on the Quick Access Tools on the top of the left corner in the document  which is shown below image.
Quick Access Tool Bar.jpg
3. Menu Bar

In Home Option, Menu Bar is one of the tool which is used to display the Ms Word Options which is shown in the below image. Menu Bar can be classified into different type. They are:
Menu-Bar-in-Ms-Word.jpeg
1. Home
2. Insert
3. Page Layout
4. References
5. Mailings
6. Review
7. View

4. Clipboard


In Home Option, Clipboard is one of the tool which is used to copy, cut,  paste, Format Painter the text in a document which is shown in the below image.
Clipboard-In-Ms-Word.jpeg
5. Font Settings

In home option, Font setting is one of the tool which is used the font settings of a text in a document which is shown in the below image.
Font-Setting-in-Ms-Word.jpeg
6. Paragraph Alignments

In Home Option, Paragraph Alignment is one of the tool which is used to align the text and font of a paragraph in documents, 
                                  Paragraph-Alignments-in-Ms-Word.jpeg
7. Font Styles

In Home Option, Font Styles is one of the tool which is used to set the text font with different styles in document. Mostly this font styles is used to font headings. 
Font-Style-in-Ms-Word.jpeg

Thursday, July 18, 2019

Office Button in Ms Word

Q. What is Office Button in Ms-Word ?


A. The word office button is came from the Microsoft company logo. It is one of the option in the Microsoft Office Package. The Office button is renamed as file menu in the ms-office 2007 version on words. It is located at the upper-left corner of the Microsoft programs.  
Micro- soft-Office-Button.jpeg

When you click on the Microsoft Office Button  then you can see the basics commands like open, save, save as, print, exit options.

However, in the 2007 Office version released more commands they are Finish and Publish. For example, in Word, Excel, and PowerPoint by pointing to Finish, and then clicking Inspect Document, you can check a file for hidden metadata or personal information.
Office-Button-Options-in-Word.jpeg
In the above office button display the option on the screen. They are :
  1. New
  2. Open
  3. Save
  4. Save as
  5. Print
  6. Prepare
  7. Send
  8. Publish
  9. Close
New

In Ms Office, new is one of the option in the Office Button which is used to create a new document in the Ms-Office Package. 

1. Click on Office Button.
2. Select the New Option.
3. Click on the new option (or) Short cut key Ctrl + N  create a new document.  
4. It will show a new document which is shown in the below images.

Create-a-new-document-page-in-word.jpeg

Open

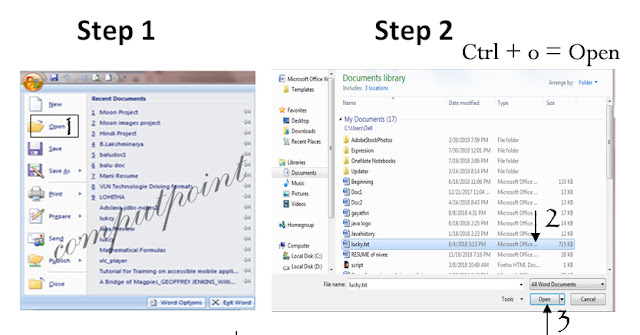
In Ms Office, Open is the option in the office button which is used to open the documents .

1. Click on the office button.
2. Select the open option.
3. Click on the option (OR) Short Cut key Ctrl + O  for open a existed document.
Open-the-document-in-Ms-Word.jpeg
➤ Save

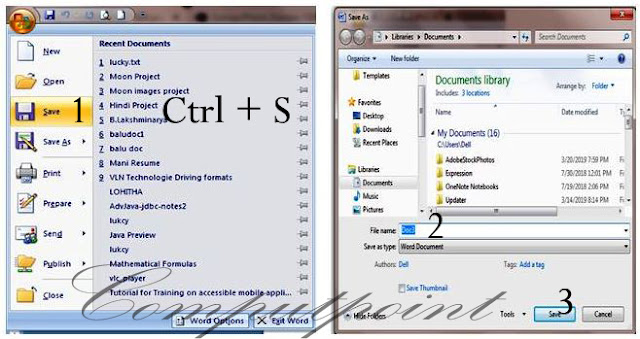
In Ms Office, Save is one of the option button which is used to save the document permanently in the memory. 

1. Click the Office Button.
2. Select the save option.
3. Click on the save option (or) short cut key CTRL + S . which is shown in the below image.
Save-the-Document-in-ms-word.jpeg

➤ Save As

In Ms Office, Save as  is one of the option in the office button which is used to save the same document with another name i.e save as option.

1. Click on the Ms Office Button.
2. Select the Save As Option.
3. Click on the Save As Option (or) Short cut key Shift + F12.

➤ Print

In  Ms Office, Print is one of the option in the office button which is used for print the documents .

1. Click on the office button.
2. Select on the print option .
3. Click on the Print option (Or) short cut key CTRL + P .  which is shown in above image.

Monday, July 15, 2019

TALLY SHORTCUTS KEYS

 TALLY SHORTCUTS KEYS


⃟  Alt + R             : Repeat the previous narration
⃟  Alt + 2             : Duplicate an entry (useful for same entries at different dates)
Ctrl + A            : Accept a form
Ctrl + G            : Select Group 
Ctrl + Alt + R : Rewrite data for company
Alt + A            : Add a voucher (or) Alter a column in a columnar report
Alt + C            : Access calculator in amount filed
Alt + D            : Delete a voucher / master
Alt + E            : Export tally data in various formats
Alt + I             : Insert a voucher 
Alt + P            : Print a report
Alt + U            : Rewrite last line deleted with Alt + R
Alt + X            : Cancel a voucher 

F1 : To select a company o select the accounts button and inventory buttons At all masters menu screen At the accounting / inventory voucher creation and alternation screen

F2  : To change the menu period at almost all screens in TALLY
F3  : To select the company at almost all screens in TALLY
F4 : To select the contra voucher at accounting / inventory voucher creation and alternation screen 

F5  : To select the payment voucher at accounting / inventory voucher creation and alternation screen

F6 : To select the receipt voucher at accounting/ inventory voucher creation and alternation screen

F7 : To select the journal vochur  at accounting/ Inventory voucher creation and alternation screen

F8 : To select the sales voucher at accounting/ Inventory voucher creation and alteration screen

F8 (CTRL+ F8)  : To select the credit note voucher at accounting / inventory voucher creation and alteration screen

F9 : To select the purchase voucher at accounting / Inventory voucher creation and alteration screen

F9 (CTRL + F9) : To select the debit note voucher at accounting / Inventory voucher creation and alteration screen

F10 : To select the reversing journal voucher at accounting / Inventory voucher creation and alteration screen

F10 : To select the Memorandum voucher at accounting / Inventory voucher creation and alteration screen

F11 : To select the functions and features screen at almost all screens in TALLY

F12 : To select the configure screen at almost all screens in TALLY


ALT + 2 : To duplicate a voucher at list of vouchers creates a voucher similar to the one where you positioned the cursor and used this key combination

ALT + A : To add a voucher at list voucher adds a voucher after the one where you positioned the cursor and used this key combination

ALT + C : To create a master at a voucher screen. At voucher entry and alteration screens, at a field where you have to select a master from a list, if the necessary account has not been created already, use this key combination to create the master without quitting from the voucher screen.

ALT + D : To delete a voucher / To delete a master

ALT + E : To export the report in ASCII,SDF,HTML OR XML format all reports screens in TALLY

ALT + 1 : To insert a voucher list of vouchers inserts a voucher before the one where you positioned the cursor and used this key combination

ALT + O : To upload the report at your website at all reports screens in TALLY

ALT + M : To Email the report at all reports screens in TALLY
ALT + P  : To print the report at all reports screens in tally
ALT + S : To bring back a line you removed using ALT + R at all reports screens in TALLY

ALT + V  : From invoice screen to bring stock journal screen at invoice screen *a  quality field *a press Alt + V to select the stock journal.

F6  : To select the receipt voucher at accounting/ inventory voucher creation and alternation screen

F7   : To select the journal vochur  at accounting/ Inventory voucher creation and alternation screen

F8  : To select the sales voucher at accounting/ Inventory voucher creation and alteration screen

F8 (CTRL+ F8)  : To select the credit note voucher at accounting / inventory voucher creation and alteration screen

F9  : To select the purchase voucher at accounting / Inventory voucher creation and alteration screen

F9 (CTRL + F9) : To select the debit note voucher at accounting / Inventory voucher creation and alteration screen

F10  : To select the reversing journal voucher at accounting / Inventory voucher creation and alteration screen

F10  : To select the Memorandum voucher at accounting / Inventory voucher creation and alteration screen

F11   : To select the functions and features screen at almost all screens in TALLY

F12  : To select the configure screen at almost all screens in TALLY


ALT + 2 : To duplicate a voucher at list of vouchers creates a voucher similar to the one where you positioned the cursor and used this key combination

ALT + A : To add a voucher at list voucher adds a voucher after the one where you positioned the cursor and used this key combination

ALT + C  : To create a master at a voucher screen. At voucher entry and alteration screens, at a field where you have to select a master from a list, if the necessary account has not been created already, use this key combination to create the master without quitting from the voucher screen.

ALT + D  : To delete a voucher / To delete a master
ALT + E  : To export the report in ASCII,SDF,HTML OR XML format all reports screens in TALLY

ALT + 1   : To insert a voucher list of vouchers inserts a voucher before the one where you positioned the cursor and used this key combination

ALT + O  : To upload the report at your website at all reports screens in TALLY

ALT + M : To Email the report at all reports screens in TALLY
ALT + P  : To print the report at all reports screens in tally
ALT + R  : To remove a line in a report at all reports screens in TALLY

ALT + S  : To bring back a line you removed using ALT + R at all reports screens in TALLY

ALT + V  : From invoice screen to bring stock journal screen at invoice screen *a  quality field *a press Alt + V to select the stock journal.

ALT +W : To view the TALLY Web browser. At all reports screens in TALLY

ALT +X  : To cancle a voucher in Day Book / List of voucher at all voucher screens in TALLY


CTRL+A  : To register Tally at licensing menu in TALLY


CTRL+B  : To select the budget at groups / u