Thursday, February 28, 2019

How to arrange the icons in the Desktop

View Options in the Desktop

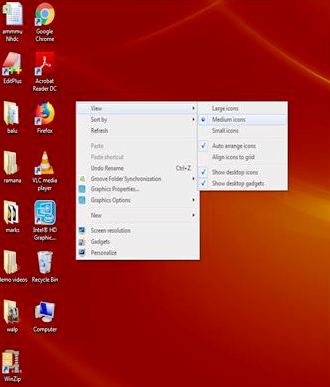
Desktop options are the important features in the computer which will display about on the screen options like view, sort  by, Refresh, Paste, Paste Short cut, New,  Screen resolution, Gadgets, Personalize.

Desktop-Option.jpeg

The Purpose of desktop options used for display the different type of operations on the computer which will show in the above picture.

view 


View is one of the option in the desktop screen which will display the desktop icons settings in the computer. When we right click on the mouse then view option will be display in the screen.  The purpose of view option used to display the desktop screen icons like they are:
View-Options.jpeg

1. Large icons.

2. Medium icons.
3. Small Icons.
4. Auto arrange icons.
5. Align grid to icons.
6. show desktop icons.
7. Show desktop gadgets.

Large Icons


Large icon is one of the option in the view which will display the large icons on the screen. How to set the large icons in the desktop Screen.

1. Right click on the mouse Pinter in the desktop screen.

2. Click on the View Menu then select the Large icons.
3. Its automatically icons will be large in size which is shown in the below image.
Large-Icons.jpeg
Medium Icons

Medium icon is the one of the option in the view which will display the medium icons on the screen. Here how to display the medium icons in the desktop screen.

1. Right click on the mouse Pinter in the desktop screen

2. Click on the View Menu then select the Medium icon option
3.Its automatically icons will be medium in size which is shown in the below image.
Medium Icons.jpeg
                                   

Small Icons

Small Icon is the one of the option in the view which will display the small icons on the desktop screen. Here how to display  the small icons in the desktop screen. 

1. Right click on the mouse pointer in the desktop screen.
2. Click on the View Menu and then select the Small Icons option.
3. Its  automatically icons will be smaller in size which is shown in the below image.

Small-Icons.jpeg

Auto Arrange icons

Auto arrange icons is one of the option in the view which will display  the icons in the proper way or step by step arrange automatically. Here how to display the 

1. Right click on the mouse pointer in the desktop screen.
2. When the icons are in improper position in the desktop like different order then click the auto arrange icons which is shown on the below image.

Auto-arrange-Icons.jpeg

3. Click on the View Menu and then select the auto arrange icons.
4. Its automatically arrange all the icons in the proper way which is shown in the below image. 

After-Arranging-the-icons.jpeg

Show Desktop Icons 

Show Desktop icon is one of the option in the  view which will show the icons hidden that means icons are not to display on the screen. Here the how to hide the icons in the screen.

1. Right click on the mouse pointer in the desktop screen.
2. Click on the View Menu then select the show desktop icons.
3. Its automatically all the icons are hidden position that means icons are not display on the screen which is shown below image.

Show-Desktop-Icons.jpeg

Show Desktop Gadgets

Show desktop gadget is one of the option in the view which will display about on the desktop gadgets on the desktop screen like Time clock, Calendar, Images, Cpu Meter Etc. Here how to display the desktop gadgets on the desktop screen.

1. Right click on the mouse pointer in the desktop screen.
2. Click on the View Menu then select the Show Desktop Gadgets
3. Its automatically all gadgets will display on the desktop screen which is shown in the below image.
Show-Desktop-Gadgets.jpeg

Monday, February 18, 2019

Tools And Parts Of Operating System


Desktop Screen and their features

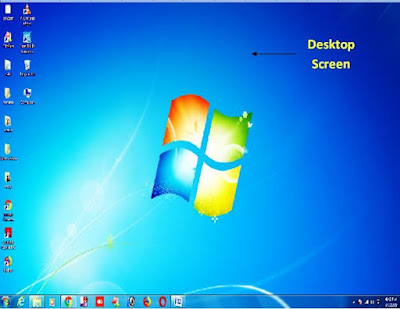
The Desktop is a one type of display screen which will see a particular option like movies, videos, images, games and any type of applications in a screen is called as desktop. Desktop are available so many types like

Ex: - T.V. LED TV , LCD T.V, etc.

The desktop is your working surface that which is representing a physical work space at home or work. It is one of the screens which you can see your computer tasks directly whether it is working are not.

Desktop-Screen.jpeg

➠ In the above image we can clearly observe the desktop screen. Whatever in the  computer operations is done by the CPU which the input is given by the user then it will display on the desktop screen.

Desktop Tools and options.jpeg

Icons :- The small pictures of a desktop are the shortcuts to the program called as icons which is clearly shown in the above image with point number 1.

When we double click on the icons then to start a program. By clicking the Start Button also shown a list of program and all other options will be shown on the computer.

Task Bar:- The sky blue bar across the bottom of the screen is called as Task Bar. which can display the task  of the running programs in the task bar that as shown in the  above image point 2.

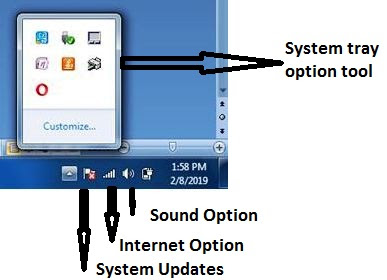
System Tray:- It is an area where you can access the programs  that are running on the background. The more program you have in this area, the longer it takes for the computer to boot up.  
  
System-Tray-Options.jpeg

The system tray of a desktop area has icons which as shown in the image to indicate which programs are currently running in the background. Once you can single  click on the left arrow button then you would be able to open and see the all options.

➠ Volume or Sound Option:- The speakers icon will open the volume controls. Once you single click on the volume button then you make a quick volume change.
Volume-Controller.jpeg


Click and drag on the bar to raise or lower the overall volume, else click on the speaker button then it will become the mute option as shown on above picture.


Mixer-Controller.jpeg

To view the sound setting, Just click Mixer button icon in task bar on open the volume controller which is shown in the above picture.

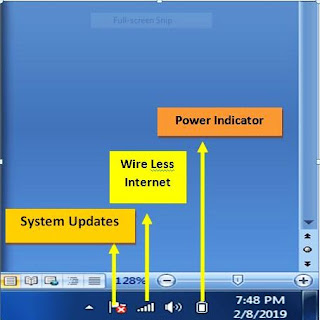
➠ Windows/ System Updates:-  A red flag symbol mark is nothing but the Windows Updates. If the computer has any updates from the Micro-soft then that symbol will be appear on the flag and you can identify what needs to be done in the picture, Once you single click then your computer will check all the updates .


Windows-Updates-Power-Button.jpeg

Power Button:- They are two symbols for power one  is a battery and the other is a power cord with charge indicator bolt. When you put on the charge of any laptop is plugged into the wall outlet and is charging.

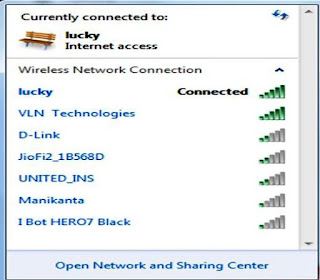
Wireless Network:- Laptop computers are the capable of connecting to a wireless network to again access to the internet. To  connect a network, right click on the wireless icon and choose which is shown in the below picture.


Wireless-Network.jpeg

 View Available Wireless Network:-  In the above picture appear that you can choose the particular network from the list of desire network and connect the connection button .

Saturday, February 16, 2019

How To Use The Keyboard

Keyboard and their Functions

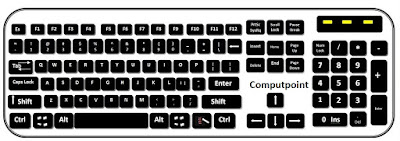
➨ Keyboard is one of the hardware component and also a input device. A computer keyboard is very much using like a typing writer keyboard. 

➨ If you are writing a letter or calculating numerical data then your keyboard is the main way to enter the information in to your computer.
Keyboard .jpeg

➨ Did you know that ?. You can also use your keyboard in control  on your computer. Here you can learn some simple keyboard commands  which can help you work more efficiently. This post updates the basics of keyboard operation in the below pictures.

How the keys are Organised

The keys on your keyboard can be classified can be divided into the several based on the functions. thy are: 

1 .Function Keys
2. Control Keys
3. Numerical keys 
4. Navigation Keys
5.Typing Keys.

Function Keys:

Functions keys are used to perform the specific task on computer which will conjunction with CTRL & ALT keys. It can be labels as F1, F2 , F3 , upto F12  which can be shown in the below image.

Functions-Keys.jpeg

ESC Key in the upper left corner keys which will used to close any menus options on computer. Example if you click the Window Button then you want to close menu and press ESC key.

  • F1 key  is used for help options whatever you want information from the computer.
  • F2 Key is used for rename the folder name or file name.
  • F3 key  is used for search folder or document.
  • F4 Key is used for display the location of the file.
  • F5 Key is used for the Refresh the page.
  • F6 Key is used for Cycle the Tab.
  • F10 key is used for active the Menu Bar in a folder.
  • F11 key is used for display between the full screen and normal  screen in browser.
Typing Keys:

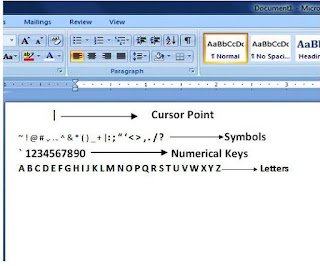
➨ When ever you need to type something in a  program, email message, or  text box, you will see a cursor or blinking an vertical line (|) this is a cursor also called as insertion point.


Typing-Keys.jpeg

➨ It shows that the where text you type will begin. You can move the cursor by clicking desired path with the mouse or by using the navigation keys as shown in the above image. 

➨ Some of the keys can also added to letters, numerical, punctuation marks, and symbols  and typing keys like Shift, Caps Lock, Tab, Enter, Space bar, and Backspace  which is show in the below images.


CapsLick-Shift-TabKey-Space-Bar-EnterKey.jpeg
  • Caps Lock Key is used in the typing text. While pressing this key once will make all letter capitalized . Press again this key for turn off the caps lock .
  • Shift Key  is used for combination of letters with any letter you type an Upper case or Capital Words
  • Tab Key is used for creating 3 to 4 space gap between the letter at a time.
  • Space Bar Key   is used for creating a one space gap between the words.
  • Back Space Key is used for remove the space of before the cursor.
  • Enter Key is used for the go to next line in the document.
Control Keys:

Control keys are used for the conjunction with other keys to perform the various function working. So some of the keys are CTRL, ALT, Window Button which is shown in the above image.

Ctrl Key is used for the conjunction with the other keys to perform various function. (Like Ctrl + S  save the document  in the Ms-Word).

Windows Key woks like pressing the Start Button  on the computer screen.

ALT Key is used for another helper key used in conjunction with other keys.

Some Of the Useful Short Cut keys

➥ Window Key     =  Open the Start menu.
➥ ESC  Key            =  Close the menu bar.
➥ Alt+Tab              =  Switch between the open windows.
➥ Alt + F4              =  Close the windows.
➥ Ctrl + A              = Select all the data.
➥ Ctrl + S               =  Save the file or document.
➥ Ctrl + C              =  Copy the file or document.
➥ Ctrl + X             =  Cut the data.
➥ Ctrl + V             =  Paste the data.
➥ Ctrl + Z             =  Undo .

Navigation Key:

The Navigation keys is used to move the cursor and around in document and web pages which is shown in the below image.


Navigation-keys.jpeg

➥ Arrow Keys  : Used for move the cursor the document and scroll the web pages .
➥ Home             : Used for move the cursor to starting line or begging of a line of text .
➥ End                 : Used for move the cursor  to the end of a line .
➥ Page up          : Used for move the page from down to up.
➥ Page Down   : Used for move the page from up to down.
➥ Delete            : Delete the file or document.
➥ Insert             : When typing to over the words you have already typed .
➥ Prnt Scrn      : Used to Print the screen of any thing in the computer.
➥ Scroll Lock   : Used to lock the screen page.
➥ Pause Break : Used to pause or break in page.

➧  Numerical keys:

Numerical keypad shows the number like 0 to 9 which i sued for the calculating addition, subtraction, multiplication, division, etc. we can also use the navigation number by using the number such as 4 & 6 are left and right direction , 8 & 2 are the bottom and up direction which is shown in the below image.  


Numerical-Keys.jpeg

In the above image 3 yellow indications shows about on Num Lock, Caps Lock, Scroll Lock. 

Monday, February 11, 2019

MS-PowerPoint Short Cut Keys

MICROSOFT POWER POINT SHORT CUT KEYS


  •  Ctrl + A                 :    Select all items on the page or the active text box
  •  Ctrl + C                   Copy
  •  Ctrl + P                 :    Opens the print dialog box
  •  Ctrl + S                 :    Save
  •  Ctrl + V                 :    Paste
  •  Ctrl + X                 :    Cut
  •  Ctrl + Z                 :    Undo last change
  •  F5                           :    View the slide show
  •  S                             :    stop the show. Press S again to restart the show
  •  Esc                         :    End the slide show
  •  Ctrl + A                 :    select all items on the page or the active text box
  •  Ctrl + B                 :    Applies bold to the selected text
  •  Ctrl + D                   Duplicates the selected object
  •  Ctrl + F                    Opens and find dialog box
  •  Ctrl + G                 :    Opens the grids and guides dialog box
  •  Ctrl + H                 :    Opens the replace dialog box
  •  Ctrl + I                   :    Applies italics to the selected text
  •  Ctrl + M                 :    Inserts a new slide
  •  Ctrl + N                 :    Opens a new blank presentation
  •  Ctrl + O                 :    Opens the open dialog box
  •  Ctrl + T                  :    Opens the font dialog box
  •  Ctrl + U                  :    Applies underlining to the selected text
  •  Ctrl + V                  :    Paste
  •  Ctrl + W                 :    Close the presentation
  •  Ctrl + Y                  :    Repeats the last command entered
  •  Home                     :   Moves cursor to beginning of current line to text
  •  End                         :    Moves cursor to end of current line of  text
  •  Ctrl + Home         :    Moves cursor to beginning of  presentation
  •  Ctrl + End             :    Moves cursor to end of presentation
  •  Page up                  :    Moves to previous slide
  •  Page down            :    Moves to next slide
  •  Ctrl + Left arrow         :   Moves cursor to beginning of  previous word
  •  Ctrl + Right arrow      :   Moves cursor to beginning of next word
  •  Ctrl + Up arrow           :   Moves cursor to start of previous paragraph
  •  Ctrl + Down arrow     :    Moves cursor to start of next paragraph
  •  Shift + Left arrow       :    Selects the previous letter
  •  Shift + Right arrow    :    Selects the next letter
  •  Shift + Home               :    Selects text from the cursor to start of the current line
  •  Shift + End                   :    Selects text from the cursor to end of the current line
  •  Shift + F1                      :    Help
  •  F7                                   :    Spellcheck
  •  F12                                 :    Opens save as dialog box
  •  Shift + Ctrl + Home   :    Selects all text from the cursor to the  start of the active text box
  • ➤ Shift + Ctrl + End       :    Selects all text from the cursor to the end of the active text box
  •   
  • ➤ Space bar or Click the mouse  :    Move to next slide or next  animation

Wednesday, February 6, 2019

Different Types of Printers

One of the important output devices is the printer. Generally printers are divided into two categories. They are :
  1. Impact Printers.
  2. Non-Impact Printers.
An impact printer creates an image by passing an inked ribbon against the paper, using pins or hammers to shape the image. A simple example of an impact printer is a type writer which uses a small hammers to strike the ribbon. An Non impact printers use other means to create an image.

Example:- It use tiny nozzles to spray the droplets of ink onto the page. Laser printers work like photo copies, using heat to bond microscope particles of dry toner to specific parts of the page.

Impact printers
  1. Dot Matrix printers
  2. Line printers
  3. Band printers
  4. Daisy wheel printers
1. Dot Matrix Printers


➧ Dot matrix printers are impact printers and are commonly used in work places where physical impact with the paper is important.
➧ These printers can be produced sheets of plain text very quickly. They are also used to print  wide sheets.

➧ A dot matrix printers creates an image by using a mechanism called print head, which contains a cluster of short pins arranged  in one or more columns.
The lowest resolution dot matrix printers have only nine pins, the highest resolution printer have twenty four pins.
➧ Dot matrix printers are not commonly used in home, they are still widely used in business.

2. Line printers

 This is a special type of impact printer works like a dot matrix printer but uses a special wide print head that can print an entire line of text at one time.

 Line printers are not high resolutions but are incredibly fast.
➧ The faster can print 3000 lines of text per minute.

3. Band printers

➧ A band printer options can be rotating band that's raised with alpha numeric characters.

 To print a character, the machine rotates the band to the desired character, then after small hammer taps the band pressing the character, against a ribbon .
  Band printers are very fast and very robust.

4. Daisy Wheel Printers

  This printer is used a spinning wheel with characters embossed around its edge .
  A hammer strikes the wheel from behind pressing a character against a ribbon.

  Daisy wheel printers can be created as clean text but it cannot print the graphics.
  They are also very slow in comparison with other printers.

Non-Impact printers
  1. Inkjet Printers
  2. Laser Printers
1. Inkjet Printers

  We can create an image directly on the paper by spraying ink through tiny nozzles.
  Now a days these models can print from two to four pages per minute.
  When compared to laser printers, the operating cost of an inkjet printer is low.
  Expensive maintenance is rare, and the only part that needs routine replacement is the ink cartridge.

  Many inkjet printers are using one cartridge for color printing and a separate black-only cartridge for black and white printing.
  This feature saves the money by reserving colored ink only used  for color printing.
  Inkjet printers offer a cost effective way to print in color.
  Color inkjet printers have four ink nozzles, blue, red, yellow, and black.
  These four colors are in almost all color printing because it is possible to combine them to create any color.
  Notice that the colors are different form the primary additive colors are different form the primary additive colors (red, green, blue) used in monitors.

2. Laser Printers

  Laser printers are more expensive than inkjet printers, their print quality is higher, and most re faster.
  A separate CPU and memory are built into the printer to interpret the result is it receives from the computer and to control the laser.
 The result is a completed piece of equipment that uses technology similar to that in photo-copies.
  The quality and speed of the laser printers make them idle for office environments where several users can easily share the same printers via LAN.

  The laser in laser printers can aim at any point on a drum, creating an electrical charge.
  Toner,which is composed of tiny particles of oppositely charged ink, sticks to the drum in the places the laser has charged.
 The colors used are the same as in the color inkjet printer Cyan, Magenta, yellow and black.
 Single color model laser printers can produce between four and sixteen pages of text a minute.
  The resolution for laser printers is 300 or 600.
  Convenience is another advantage of laser printers.
  The disadvantage of laser printers are the price and the cost of operation.