Wednesday, November 18, 2020

how to create a letter in ms word.

 How to Prepare Letter Format document on MS-Word.

Letter format document is used to the create the documents used for school leave letters, Professional Business letters, Personal Family Letters, Government Authority Letters, Etc...

In the below following steps is used to the create a sample letter.

1. Click Window Button + R.

Run Command Prompt on ms Word.jpg
2. On the Run command  prompt  write as  "winword" .

3. Click on the OK button Or Press enter button .

4. After a few Seconds Ms word document format will be open. Which is shown in the below image.

Letter format document on ms word.jpeg

5. Write a sample text like Letter Format on the document.

Left alignment option in letter format.jpeg

6. By default letter text is placing on the left alignment.
7. Select the particular text and apply Bold, Under Line , center alignment options (Ctrl +  E)  short cut key for applying the text. Which is shown in the Below image.

Bold, Under Line, center alignment option .jpeg

8. Write a sample text like Place, Date on the right alignment option in a document.

Right alignment option .jpeg

9. Write a sample text like TO  address, The Class Teacher on left alignment option in a document.


10. Write a text on body of the message in a letter document. After select the paragraph text and click justify option in the paragraph alignment. 

Body of the message on letter format.jpeg

11. Write a sample text like yours faithfully on the right side alignment option.

Right side alignment text.jpeg

12. Finally doing all the steps, we simply check the document format i.e alignments every thing. Later we check the print preview option Ctrl + F2 short cut key. 

13. Finally the letter format document is over.

Letter document format.jpeg


Monday, November 16, 2020

What is Control Panel options on windows 7, 8, 10.

CONTROL PANEL

The  Control  Panel  has  special  tools  that  are  used  to  change  the  way  Windows   looks  and  behaves.  Some  of  these  tools  help  you  to  adjust  settings  that  make  your  computer  easy  to  use.

For example: There is an option to change the settings of mouse, by replacing standard mouse pointers with animated icons that move on the screen and so on.

To open the Control Panel window, follow the given steps:

Step-1 Click the Start button.
Step-2 Click the Control Panel option.

➡️ The  control  Panel  window  that  appears  on  the  screen  shows  a  number  of  options.
➡️ The Control Panel of  Windows  7  can  be  seen  in  three  different  views  (Category,  Large  icons,  Small  icons).
➡️ You see many categories in the control Panel window like Appearance and Personalization,  Hardware and Sound etc. Each category has its own specific purpose. which is shown in the below image.

control panel option in window Button
Control panel

➡️ In the above image there are different types of options available they are :
1. System and security.
2. Network and Internet.
3. Hardware and Sound.
4. Program.
5. User Accounts and family Safety.
6. Appearance and Personalization.
7. Clock, Language and Region.
8. Ease of Access.


Monday, December 23, 2019

paragraph alignment in ms word

Horizontal text Alignment alignment display the appearance and orientation of the edges of the paragraph. Like Left aligned text, Right aligned text, centered text,  or justified text. 

Text alignments is one of the options in ms word which can be use to  adjust the paragraph like left alignment, right alignment center alignment. By default paragraph have contain left alignment in the document which is shown below image.
paragraph alignment in ms word 2007.jpeg
Paragraph alignments are classified into 4 types they are:
  1. Left Alignment.
  2. Right Alignment.
  3. Center Alignment.
  4. Justify the text.
Left alignment 

Left alignment is one of the option in ms-word which can be use to align  the text in the left side margin. That is shown in the below image.
Left alignment in ms word 2007.jpeg
1. Write a sample text on a word document.
2. Select the text  or paragraph that you want to align.
3. On the home tab, in the paragraph options, click the left align button option.
4. Enter short cut key for left alignment Ctrl + L.
5. Left alignment is a default option when you take a empty document in MS-word.  

Right alignment

Right alignment is one of the option in ms-word which can be use to align  the text in the Right side margin. That is shown in the below image.
 right alignment in ms word 2007.jpeg

1. Write a sample text on a word document.
2. Select the text or paragraph that you want to align .
3. On the home tab, in the paragraph options, click the Right align button option.
4. Enter the short cut key for Right alignment Ctrl + R.

Center Alignment

Center alignment is one of the option in ms-word which can be use to align  the text in the center side margin. That is shown in the below image.
center alignment in ms word 2007.jpeg
1. Write a sample text on a word document.
2. Select the text or paragraph that you want to center .
3. On the home tab, in the paragraph options, click the Center align button option. (OR)
4. Enter the short cut key for center alignment is Ctrl + E.

Justify

Justify is one of the option in ms-word which can be use to adjust the text or paragraph with full of margin. That is shown in the below image.

justify the text in ms word 2007.jpeg
1. Write a sample text on a word document.
2. Select the text or paragraph that you want to Justify.
3. On the home tab, in the paragraph options, click the justify align button option. (OR)
4. Enter the short cut key for Justify alignment Ctrl + J.

Saturday, August 10, 2019

Clipboard Tool in Ms Word

Clipboard Option in  MS-Word


Clipboard is one of the tool option in Ms Word. Which is used to show the office clipboard task pane that is shown in the below image. 
Clipboard-tool-in-ms-Word.jpeg
Clipboard tool can be classified into 4 types they are:
  1. Cut (Ctrl + X)
  2. Copy (Ctrl + C)
  3. Paste (Ctrl + V)
  4. Format painter (Ctrl + Shift + C)
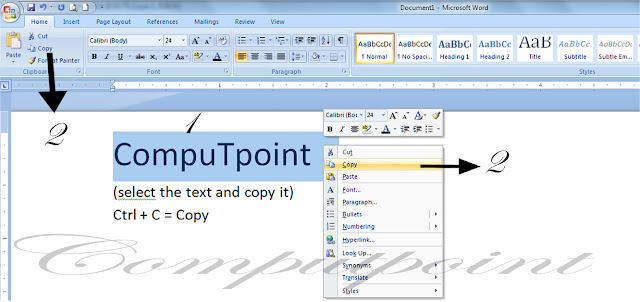
➧Copy: Copy is one of the tool option in ms word, which is used to copy the selected text and put it on the clipboard that is shown in the below image.
Copy-option-in-ms-word.jpeg
Copy image 1
1. Take a simple text on a document like CompuTpoint.
2. Select it all the text through the mouse (or) Ctrl + a shortcut key.
3. Right click on the mouse and options will display.
4. Click on the copy option or click shortcut key (Ctrl + C).
5. Automatically text will be copied.

➧ Paste: Paste is one of the tool option in ms word, which is used to paste the text that means to display the double text which is shown in the below image. 
Paste-Option-in-Ms-Word.jpeg
Paste image 2
1. Already we copy the text in the image 1.
2. Right on the click mouse .
3. Select on the paste option or click short cut key ( Ctrl + V ).
4. Automatically text will be pasted.

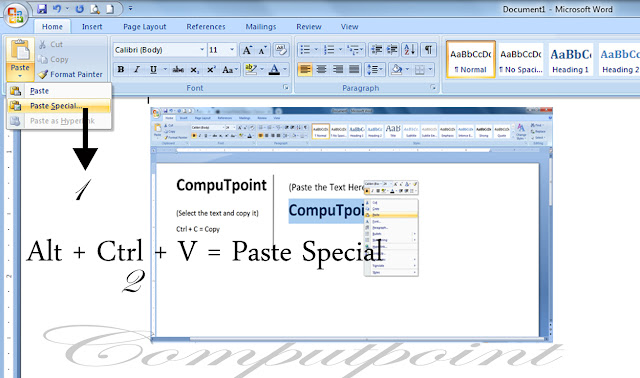
Paste special : Paste Special is one of the  option on  paste tool option in ms Word. Which is used to paste and display the page screen of a document that is shown in the below image.
Paste-Special-in-ms-word.jpeg
Paste Special Option
1. Click on the paste tool bar.
2. Select the Paste special option or click shortcut key Alt + Ctrl + V which is shown in the image.
3. Automatically the page screen will be pasted.

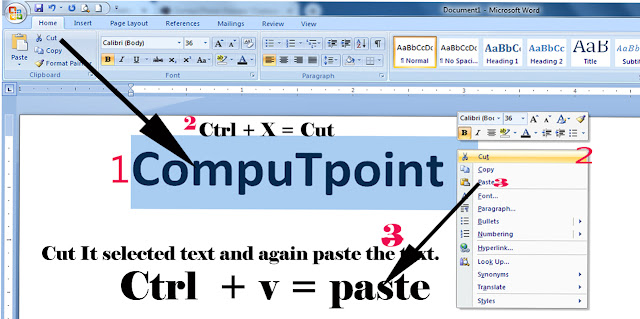
Cut: Cut is one of the tool option in ms word, which is used to cut the selection from the document  and put it on the clipboard that is shown in the below image.
Cut-Option-in-ms-word.jpeg
Cut image 
1. Take a simple text on a document.
2. Right click on the mouse and selected the cut option or click Ctrl + X 
3. After cut the text and place the text wherever you want by using paste option or click Ctrl+ v.

Friday, August 2, 2019

Applying the text colors in ms Word

The Text highlight Color

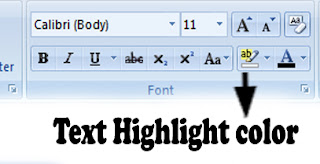
Text Highlight Color: Text highlight color is one of the tool on font setting option in ms word. which is used to applying color on make text look like it was marked with highlighter pen. which is shown as below image.
Text-Highlight-color-in-ms-word.jpeg
  1. Click on the Text highlight color tool option and it display the some color on the screen which is shown in the below image.
    Text-highlight-colors.jpeg
  2. write a sample text on a document example like  Computpoint.
  3. Tap the right side option bar on the text highlight tool. 
  4. Select the particular color for highlight a text.
  5. Then automatically text will be highlight.

                      Apply-Text-Highlighting-color.jpeg

Applying the font color


Font color:  Font color is one of the tool on font setting option in ms word.  which is used to apply the change text color which is shown in the below image. 
Change-Font-color-Tool-in-ms-Word.jpeg
  1. Click on the font color tool option and it display the different type of colors which is shown in the below image.                                                                                  
  2. In the above image, we have four types of colors option they are: Automatic Color, Theme Colors, Standard Colors, More Colors.
  3. Automatic is the default color option whenever we take a new document in the ms word.
  4. Theme colors are the option to changing the font colors of a text .
  5. Standard colors are used to fix the font color of a text.
  6. suppose we want to take more colors then we click on the  more colors option.
  7. we take an example text on a page  and select the any colors of the options. Then its automatically change the font color of a text.
Changing-the-font-color-of-text.jpeg

Thursday, July 25, 2019

Change case tool in Ms Word

Change Case

Change case is one of the tool in ms word. which is used to change all the selected text to Uppercase, Lowercase, Toggle-Case, or other common capitalization. which is shown in the below image.
Change-Case-in-Ms-Word.jpeg
Change Case can be classified into five types they are:
  1. Sentence Case
  2. Lower Case
  3. Upper Case
  4. Toggle Case
  5. Capitalization
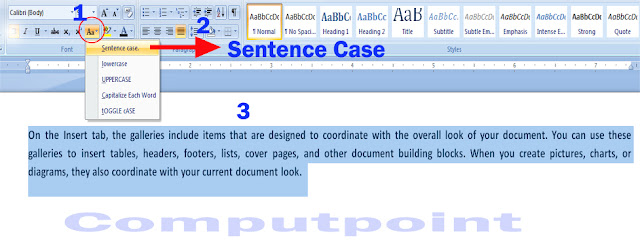
Sentence-Case : Sentence Case is one of the option on change case tool in ms word. which is used to change the sentence case i.e first letter of the paragraph is capital letter. which is shown in the below image.
Sentence-Case-in-Ms-Word.jpeg
  1. First, we take an simple paragraph sentence and select it.
  2. Click on the Change case tool on the right side option bar.
  3. Select the Sentence Case option.
  4. Automatically it changes into the sentence case which is shown as above image.
Lower-Case : Lower Case is one of the option on Change Case tool in ms word. Which is used to change the sentence into Lower Case i.e first letter of the paragraph is small letter. which is shown in the below image.
Lower-Case-in-Ms-Word.jpeg
  1. First we take an sample paragraph sentence and select it.
  2. Click on the Change Case tool on the right side option bar.
  3. Select the Lower Case Option.
  4. Automatically it changes into Lower Case which is shown as above image. 
Upper Case: Upper-case is one of the option on change case tool in ms word. Which is used to change all the letter into Capital letters. Which is shown as in the below image.
Upper-Case-in-Ms-Word.jpeg
  1. First, We take an sample paragraph sentence and select it.
  2. Click on the Change Case tool on the right side option bar.
  3. Select the Upper case option .
  4. Automatically all letter will be changed into capital Letters which is shown as like above image.
Capitalized Each Word : Capitalized each word is one  of the option  on change case tool in ms word. Which is used to change  all the first letter of word as capital which is shown as below image.
Capitalized-Each-Word-in-Ms-Word.jpeg
  1. First,We take an sample paragraph sentence and select it.
  2. Click on the Change Case tool on the right side option bar.
  3. Select the Capitalize Each Word option.
  4. Automatically it changes the Capitalize the each word which is shown as a above image.
Toggle Case : Toggle Case is one of the option on change case tool. Which is used to change the first letter of the word is  small which is shown as below image.
Toggle-Case-in-Ms-Word.jpeg

Tuesday, July 23, 2019

Tools and Options of Font Alignments in Ms Word

Font Alignments in Ms Word


A font alignment is one of the tools and options in Ms-Office. The word font alignment indicates that how to set the text alignment in a document. It May Includes the Letters, Symbols, Characters, Paragraph and Numbers etc. 

Ex:~    ,` ! @,  A B C D E F , 1 2 3 4 5 6.   Computpoint etc.

The below examples are the text alignment tools which is to be set the font settings in a document which is shown below image. 

For example  Bold , Italic , Underline , Font setting,  Font Size, Increment, Decrement, Clear Format, Strike Off, Sub script, Super Script, Sentence Case..
Tools-and-Options-of-Font-Alignment-in-Ms-Word.jpeg
The Font alignments can be classified into different types They are:
  1. Font Face
  2. Font Size
  3. Increment
  4. Decrement
  5. B (Bold)
  6. I (Italic)
  7. U (Under Line)
  8. Strike Off
  9. Sub Script
  10. Super Script
  11. Sentence Case
  12. Text Highlight Colors
  13. Font Colors
Font FaceFont face is one of the tool in font option. Which is used to change the font face with different Formats which is shown on the below image.
  1. Click on the font face tool (OR) CTRL + Shift + F short cut key.
  2. Tap the option button on right side bar and display the different font style.
  3. Select the particular option of the font style.
  4. Automatically  it changes the font style which is shown as above image.
➧ Font Size: Font size is one of the tool in font setting option. Which is used to change the font size option. Its start from 11 pt to 70 pt range which is shown as below image.
Font-Size-option-in-Ms-Word.jpeg
  1. Click on the font size Tool Option. By Default it contains 11 pt  and put the values up to 70 pt range.
  2. Tap the option button on the right side bar.
  3. Select the particular font size from 11 to 70 range. 
  4. Automatically the font size is changed which is shown like as above image.
➧ Increment & Decrement: Font Increment & Decrement are two tools option. Which is used to increase and decrease the font size which is shown in the below image.
Font-Increment-and-Decrement-In-Ms-Word.jpeg
  1. Write a sample text on a blank page like Computpoint.
  2. Click on the Increment tool (Ctrl + Shift + > ) / Decrement tool (Ctrl + Shift + <) short cut keys.
  3. Then automatically font size is increasing / decreasing which is shown above image.
Bold & Italic & UnderlineBold, Italic, Underline are the tools option in ms word. Which is used to bold, italic, underline the text which is shown the below image.
Bold-Italic-Underline-the-text-in-ms-word.jpeg
  1. First, write  a sample text on a page and select it through the mouse.
  2. Click on the B (Ctrl + B) , I (Ctrl + I) , U (Ctrl + U) Tools as like a image.
  3. Automatically the font text is changed.
Strike throughStrike Through is one of the tool option in ms word . Which is used to draw a line through the middle of the text which is shown in the below image.
Strike-Through-Of-Text-in-Ms-Word.jpeg
  1. First, we write a sample text  page like Computpoint and select it through the mouse.
  2. Click on the Strike Through tool option as like shown on the above image.
  3. Automatically, it draws a line through a middle on the text.
Super & Sub-Script: Super-Script is one of the tool option in ms word. Which is used used to create a small letters on above  of text. Sub-Script is one of the tool used to create a small letters below text which is shown below image.
Super-Script-and-Sub-Script-in-Ms-Word.jpeg

Friday, July 19, 2019

Tools And Option Of Home in Ms Word

Home Options In MS Word

In Ms Office Package, They are different types of sub-packages called Word, Excel, Power Point, Ms Access. In this Post we are learning about Ms Word  package.

In this Ms Word package, we have different types of Tools and Options for preparing the document formats in Home Option  Which is shown below image.
                    Tools-on-Home-Options-in-Ms-Word..jpeg

1. Office Button
2. Quick Access Tool Bar
3. Menu Bar
4. Clipboard
5. Font Settings
6. Paragraph alignments
7. Font Styles
8. Indent
9. Rulers Bar
10. Status Bar.

1. Office Button

In Ms Word, Home is one of the option settings which is used to prepare the document formats.  In that Home option first one is Office Button which is shown in the above image. In Office Button can classified in to different type of options they are:
Office-Button-in-Ms-Word.jpeg
1. New
2. Open
3. Save
4. Save as
5. Print
6. Prepare
7. Send
8. Publish
9. Close

2. Quick Access Tool Bar

In home option, Quick Access Tool Bar is one of the tool which will show about on the Quick Access Tools on the top of the left corner in the document  which is shown below image.
Quick Access Tool Bar.jpg
3. Menu Bar

In Home Option, Menu Bar is one of the tool which is used to display the Ms Word Options which is shown in the below image. Menu Bar can be classified into different type. They are:
Menu-Bar-in-Ms-Word.jpeg
1. Home
2. Insert
3. Page Layout
4. References
5. Mailings
6. Review
7. View

4. Clipboard


In Home Option, Clipboard is one of the tool which is used to copy, cut,  paste, Format Painter the text in a document which is shown in the below image.
Clipboard-In-Ms-Word.jpeg
5. Font Settings

In home option, Font setting is one of the tool which is used the font settings of a text in a document which is shown in the below image.
Font-Setting-in-Ms-Word.jpeg
6. Paragraph Alignments

In Home Option, Paragraph Alignment is one of the tool which is used to align the text and font of a paragraph in documents, 
                                  Paragraph-Alignments-in-Ms-Word.jpeg
7. Font Styles

In Home Option, Font Styles is one of the tool which is used to set the text font with different styles in document. Mostly this font styles is used to font headings. 
Font-Style-in-Ms-Word.jpeg

Thursday, July 18, 2019

Office Button in Ms Word

Q. What is Office Button in Ms-Word ?


A. The word office button is came from the Microsoft company logo. It is one of the option in the Microsoft Office Package. The Office button is renamed as file menu in the ms-office 2007 version on words. It is located at the upper-left corner of the Microsoft programs.  
Micro- soft-Office-Button.jpeg

When you click on the Microsoft Office Button  then you can see the basics commands like open, save, save as, print, exit options.

However, in the 2007 Office version released more commands they are Finish and Publish. For example, in Word, Excel, and PowerPoint by pointing to Finish, and then clicking Inspect Document, you can check a file for hidden metadata or personal information.
Office-Button-Options-in-Word.jpeg
In the above office button display the option on the screen. They are :
  1. New
  2. Open
  3. Save
  4. Save as
  5. Print
  6. Prepare
  7. Send
  8. Publish
  9. Close
New

In Ms Office, new is one of the option in the Office Button which is used to create a new document in the Ms-Office Package. 

1. Click on Office Button.
2. Select the New Option.
3. Click on the new option (or) Short cut key Ctrl + N  create a new document.  
4. It will show a new document which is shown in the below images.

Create-a-new-document-page-in-word.jpeg

Open

In Ms Office, Open is the option in the office button which is used to open the documents .

1. Click on the office button.
2. Select the open option.
3. Click on the option (OR) Short Cut key Ctrl + O  for open a existed document.
Open-the-document-in-Ms-Word.jpeg
➤ Save

In Ms Office, Save is one of the option button which is used to save the document permanently in the memory. 

1. Click the Office Button.
2. Select the save option.
3. Click on the save option (or) short cut key CTRL + S . which is shown in the below image.
Save-the-Document-in-ms-word.jpeg

➤ Save As

In Ms Office, Save as  is one of the option in the office button which is used to save the same document with another name i.e save as option.

1. Click on the Ms Office Button.
2. Select the Save As Option.
3. Click on the Save As Option (or) Short cut key Shift + F12.

➤ Print

In  Ms Office, Print is one of the option in the office button which is used for print the documents .

1. Click on the office button.
2. Select on the print option .
3. Click on the Print option (Or) short cut key CTRL + P .  which is shown in above image.